Monday, September 16, 2013

Abstraction sequence II

—Lesson plan—

About this time last year, I wrote about an abstraction sequence I have my students create based on work by several famous artists. Picasso, Matisse, and Mondrian—like many other artists—took a subject and abstracted it over a number of pieces to see how far they could go making it more and more abstract. I was reminded of the lesson plan, yesterday, when I got to see a similar series of paintings by Georgia O'Keefe.  In these paintings, O'Keefe starts out getting more graphic, but then she also crops in closer and closer to the subject until she eliminates most of the context for the shapes and colors.

Georgia O'Keefe, Jack-in-the-pulpit

Her progression reminded me of a similar project I did as a first-year art student. There are three parts to it:
  1. Over five steps, move closer in to the subject.
  2. With each step, as you crop in, also simplify the shapes.
  3. With each step, use a relatively darker set of values so that the five steps reflect a full value range from high key to low key.
Abstraction Sequence by Brian Jacobs, 1985

This is a great project for students because it gives them a very concrete objective. It's easier to be creative when we are constrained by a certain number of panels and a distinct set of directions. Beyond the constraints, we can come up with our own ideas. But the constraints force us to focus.

The assignment also gives us context; it's easier to understand your final color scheme when you've started with a light set of values and worked darker. The same is true of the simplification of the shapes: it's easier to abstract in smaller steps. By the time we get to the last panel, we are organizing the painting in terms of design, not realistic representation.

O'Keefe's series is similar. We do not have the first painting in her series.  But if we compare Jack-in-Pulpit – No. 2 to Jack-in-the-Pulpit No. 3, we can see that she is simplifying and hardening the edges. By No. IV, some of the previously rounded forms have become more square. But also, at this point, she starts cropping in closer to the inside of the flower. When she gets to No. VI, we sense that it references life, and from the context of the rest of the series, we know it is the spadix of the flower. But now our focus is on pure form. Using O'Keefe as a model, students can create their own progression to learn about abstraction as well as color and value.

CR 716 Jack-in-Pulpit – No. 2, 1930

CR 717 Jack-in-the-Pulpit No. 3, 1930

CR 718 Jack-in-the-Pulpit No. IV, 1930

CR 719 Jack-in-the-Pulpit No. 5, 1930

CR 720 Jack-in-the-Pulpit No. VI, 1930

One of my mentors always used to say, make small changes. He meant that we should advance our style and work through our ideas by making a number of works that are each slightly more developed toward the goal than the one before. This assignment is good preparation for that kind of practice. In addition, the relatively arbitrary combining of objectives makes it easier to make connections and discoveries.

Saturday, September 14, 2013

The day job

—Creativity—

In Europe, centuries ago, an artist may have spent free time on his or her own projects and a lot more time building sets for Easter pageants or altars for churches. Back then, as it may still be in some cultures, art was a trade like any other profession. But we now live in a world where artists often have two separate occupations: a day job and their craft.

This is the norm, though we often feel badly about it. Day jobs, we tell ourselves, are necessary evils while we are getting started but real artists don't have day jobs. And yet, a quick internet search reveals many, many famous artists who worked non-art jobs their entire careers. Most of the dual-profession creatives I learned about are writers, only because they tend to write about themselves. But visual artists also have to work side jobs. Sometimes we work jobs that simply help us survive. Paul Gauguin claimed to have emptied bed pans in an insane asylum to support his art. Been there, done that. Jobs like this are only short-term solutions to desperate situations. But there are advantages to getting a good, permanent day job.

A secure, sustainable, livable salary can only make it easier to be an artist. When one has enough money (and that doesn't have to be a fortune for the starving artist), free time is unencumbered by the stresses of survival. These stresses can seem to dominate every hour of every day when we are in survival mode. But when the bills are paid and the refrigerator stocked, we can come home and get a couple hours of good, solid work accomplished. Most artists create better when they are able to get into a healthy flow with the work. Time helps but money, in many ways, helps more.

When your time for art is limited by your day job (time is always limited), you will hopefully find yourself using your time more aggressively for your art. This is where a good day job and a bad day job differ. Coming home from a job that doesn't even pay the bills does not inspire hard work at home. After all, you just worked your tail off for not very much at the office. But when the hard work at the office pays dividends, then you will want to keep reaping benefits at the easel as the day dissolves. Having limited time to make art forces us to focus more, cut straight to the essentials, and get our work done. Having money in the bank gives us permission to indulge in our craft instead of poring over bills and making emergency runs to recycle bottles and move cash around from one ATM to another.

Having financial security means that it is easier to carve out regular time for the art without interruptions. But there are other ways that a good day job can introduce routine to an artist's life. The regularity and responsibility of a day job means that your routines are set. Most successful artists structure their studio time in the same way as a regular job. Roy Lichtenstein went to work in his studio every day as though it were a nine-to-five job so that his family got used to the idea that his time there was essential. Having a regular job forces you to have a routine and hopefully teaches you how to maintain a routine after making it big and quitting the day job. Until then, your studio routine follows your day job routine.

We might see the day job as a distraction—and if it pays less than we need to live, it really is, as it would be for anyone. But a good day job gives us security and makes it easier to maintain discipline in our craft. A meaningful, healthy day job provides social interaction outside the studio. It gives us skills we can use in our art business: bookkeeping, marketing, construction, Web design, billing, accounting, and more. The seeming incongruity of some day jobs and art making also offers perspective that we otherwise wouldn't get if we saturated ourselves with non-stop creativity. Anyway, there's only so many hours a day we can create. I find that I can work a day job more hours than I can paint, because making art takes more energy than most other occupations. And art requires contemplation or at least stepping away.

Having a day job means something else that Oscar Wilde acknowledged when he wrote, "the best work in literature is always done by those who do not depend on it for their daily bread." Financial independence from the art world means that one doesn't have to compromise vision for salability. Often, our best work has financial value only later. Financial independence from art trends means one can challenge the trends and do something different, something that doesn't yet have currency.
"Make some sacrifice for your art and you will be repaid but ask of art to sacrifice herself for you and a bitter disappointment may come to you."—Oscar Wilde
These days, however, everything takes more energy and time and money than it did a century or even decades ago. Most professions demand 110% from employees (a mathematical impossibility). Most professions demand that instead of going home and writing the novel at the kitchen table, we go home and continue working on the laptop, doing research and professional development, or catching up on unfinished office work. Many famous creatives admit to stealing time at the day job and working on their art on the sly if they had to. One way or the other, there's no room for both the day job and the art career to occupy ALL of our time.

But the two occupations are not inherently incompatible.  Being an artist is more of a cultural and social role than a financial occupation. This is not to say that artists should not make money or want to be compensated. We know that the calling to be an artist is outside our economy—just as a minister's or doctor's calling is outside our economy. But that doesn't mean that it is wrong to make money off the art. The art economy is largely distinct from our regular economy. So we don't need to experience conflict between a day job and a profession as an artist. They are two separate things. One  provides a secure cash flow to invest in the other, but that investment is intended to pay off at some point, to some degree. Selling art in the art economy is more like receiving patronage, even in today's art marketplace. When we let art slip into the regular marketplace, we risk corrupting it more.

So getting that day job and using it well is a challenge. But if we can use it as a financial resource, it can benefit our art making, as long as we can safeguard the time we have left after the work day is done.

Thursday, September 12, 2013

Building cardboard flat files

—News from the studio—

A pile of my prints.

Often, when I find a need for some resource in the studio, I will build it myself. This week, while in the process of organizing and documenting all my artwork, I found that I needed some flat files to separate and store my prints, drawings, and small paintings. Here's the story of how I found a cheap solution.

I began with a bunch of free boxes. I cut them in half and shortened the width of the side flaps so I could reassemble them only as deep as a strip of 1x2. This meant that the front and back flaps also had to be cut down to the same size.

Cutting down the box using my mat cutter.
Measuring the height of a 1x2.
Side cut to fit 1x2. The end flap isn't cut down yet.

For the 1x2 strips, I found eight foot sticks made of recycled wood fiber for $2.24 each. They come coated with white primer, so they were a perfect choice. I cut two pieces from each stick for the sides of the flat file and stapled the cardboard to the wood. Now, I had two parts for the flat file: a top and a bottom.

Stapling the cardboard sides to the wood

I stacked the top and bottom pieces and stapled the loose cardboard to the tops of the 1x2s on each side, leaving the staples off about 1/3 of the length from the top so I could make a larger top flap. I only had to staple down one half of the top and bottom since the cardboard wraps around and is stapled on the sides. To make the flap, I very, very lightly scored across the top with a utility blade. When making boxes, I always score the side that bends in.

A flap cut in the top for easy access.

I taped the flaps down in the back; they never need to be opened.

The back flaps are permanently taped.
The front ones can be taped closed with less tape as needed.

And here are my six finished flat files. I've already got one in use. They are light, sturdy, and easy to stack. And they each cost me only $2.24 in materials.

The flat files completed.

The first one with paintings stored and the flap labelled.

Saturday, August 31, 2013

Persistence and perseverance

—Creativity—

Early one Manhattan morning, I saw several men drag a big food cart from the parking space where it was hitched behind their vehicle. They pushed it into the intersection, stopped it from rolling, turned it around, and pushed it back onto the sidewalk at the crosswalk. This took some time; the cart was very heavy and I could see they were struggling at every step. They seemed to be fighting against the nature of the thing, and the physics of the planet that the wheels and the weight wanted to obey. But once the process had started, it had to be completed. Trying to put it in place, they knocked down the pedestrian crossing light, but they got the cart onto the sidewalk where they could sell food for the rest of the day.

"This is the highest wisdom that I own: freedom and life are earned by those alone who conquer them each day anew."
—Johann Wolfgang von Goethe

Every morning, these men do the same thing, with the same struggle. All over the city, in the summer heat, they push these miniature restaurants through the streets, some of them with hot coals already smoking. And it's not easy. To begin with, they must find two legal parking spaces beside each other to pull the vehicle and the trailer into. Then they have to unhitch the cart and push it where it needs to go. Sometimes they park close to that location. Sometimes, they can't.

The streets in Manhattan are not level. Particularly running east and west, there are hills that you barely notice until you are inside a building and have to take stairs between avenues. Pushing a food cart, or pushing anything, is work.

When I saw these men struggling, so physically, to make a living, I thought, this is what an artist must do. An artist has to persevere in the same way. We have to work extraordinarily hard like the vendors. For someone living in the suburbs or in the country, this might seem crazy. Why work so hard? In the city, however, this is life. Someone living like this might very well think, this is unbearable and I'm a fool for doing it. But this is what we do. In the suburbs and the country, we have different ordeals.

"I know the price of success: dedication, hard work, and an unremitting devotion to the things you want to see happen."
— Frank Lloyd Wright

Not long after watching the food vendors, I saw a woman load her children, baby carriage, and luggage onto the bus. She required the driver and a half-dozen passengers to help her and all her charges. Everyone seemed invested in her mission. She made several trips back and forth between six bus seats and the sidewalk getting everything in and out.

This is nothing unusual. You might see her determinedly leading her pack down the sidewalk with parcels on the roof of the carriage. She will take the children forty blocks, their little feet traveling twice as many steps as hers. When they arrive at their walk-up, it's just another episode in their daily adventure. On and off the subway, one sees people like her on an epic quest to get things from here to there and get things done.

This spirit of struggle, of perseverance, of persistence, of can-do-no-matter-what—this is the spirit of the artist. It's not workaholism or idle occupation. We are not bored. We are surviving.

The last I saw, the city still hadn't put up a new crossing light. The one the vendors damaged is gone. I would have felt very bad about breaking city property, and I would have been very uncomfortable parking my business under the damage. Maybe they felt this way, too. But in New York City, maybe not! The woman on the bus didn't express any discomfort at inconveniencing all the other passengers. She was assertive about the seats she wanted for her kids. She didn't try to carry too much at one time. Without any apparent damage to her pride, she let the others help her. She may have said I'm sorry and thank you, but she was in no hurry. She took her time and did what she needed to do.

And this is another part of the deal, I suppose.  We must accept that we are going to be a little nuisance from time to time, and that's part of being the artist too.

Wednesday, August 28, 2013

My woodblock printing process

—News from the studio—

In today's post, I show the ten-step process that I used to make one of my woodblock prints in 1996.

St. Mark's Cathedral During an
Organ and Choral Recital

The story starts in the early nineties when my friend Mike and I managed to get admission to an organ and choral performance at Saint Mark's Cathedral in Seattle with only enough money between the two of us for one ticket. We discovered that a party was short one attendee and had left their extra ticket at the door for a poor artist like one of us and we took it. I had a sketchbook and drawing board with me and I drew the audience, the choir, and the architecture. Most of the resulting sketch was influenced by one of the pieces on the program—a movement of Messiaen's L'Ascension. As I was listening and drawing, I thought of a passage from In Search of Lost Time in which Proust describes music from a violin, as I remember, filling the room visually.

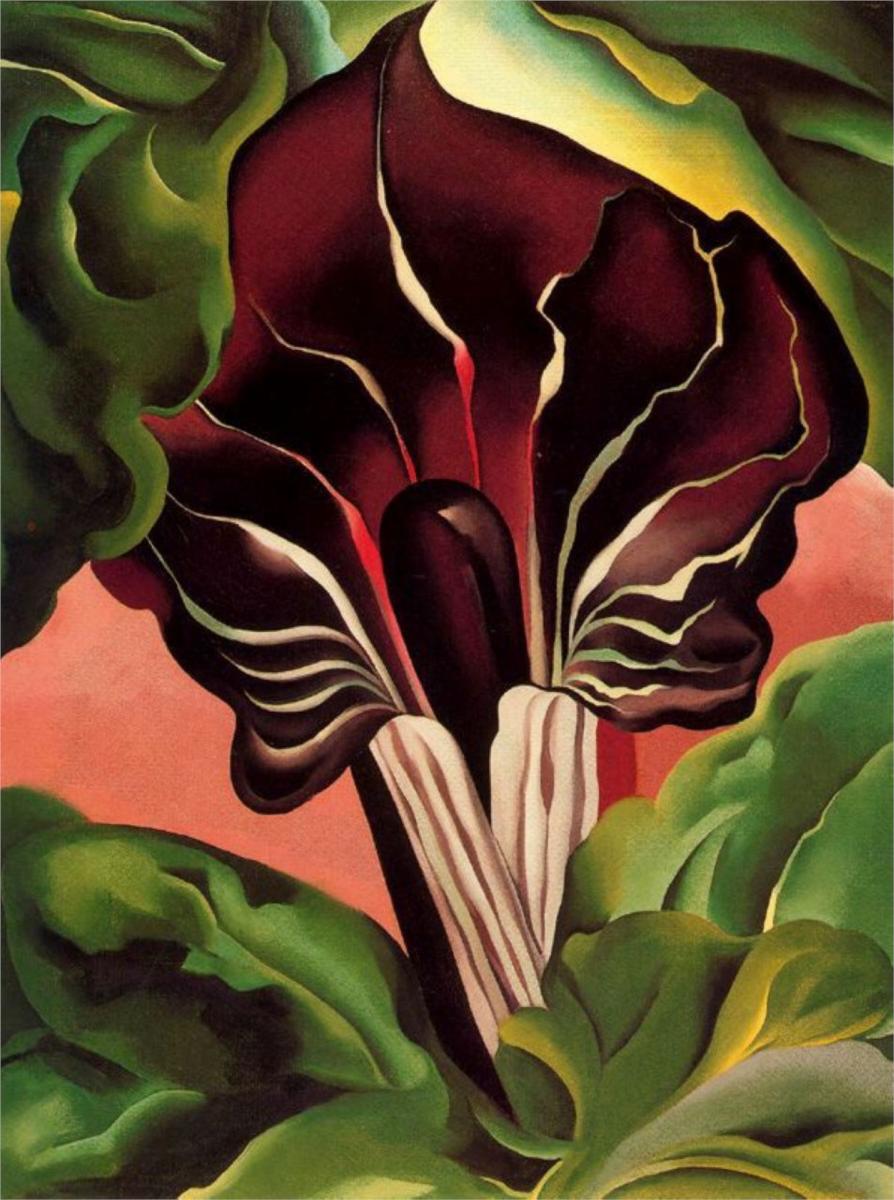
I took the sketch home and began turning it into the woodblock print you see above and I titled it Saint Mark's Cathedral During an Organ and Choral Recital.

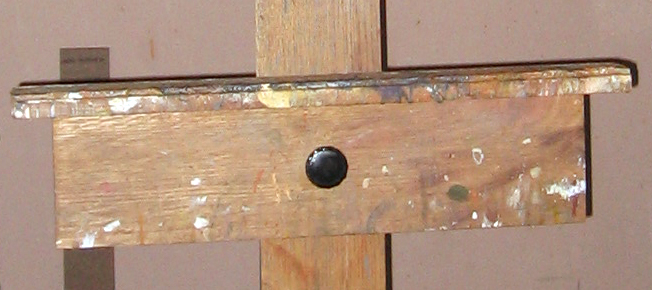
To make this print, I needed to carve blocks of wood to roll with ink and press into paper.

This is what one of the carved blocks looked like. The blocks were destroyed long ago because they were too large and heavy to keep.


This block happens to be the fourth block in the sequence of runs using, as you can see, violet ink. If you look closely, you can see an arrow that tells me which way is up and a number four that tells me when to print the block (after the third block). You might notice that the image in the block is a mirror image of the final print.

In the following ten pictures, the print evolves through successive impressions from each of ten different woodblocks. Each run is a different color ink rolled onto a hand-carved block of pine and transferred to the rice paper by rubbing the back of the paper with barrens and wooden spoons.

One

Two

Three

Four

Five

Six

Seven

Eight

Nine

Ten

The color is not entirely accurate, due to the fact that the value changed with each run so the auto-exposure on the camera shifted. Or maybe it's my cheap scanning equipment. Nonetheless, you should be able to see the transformation.

If you are very observant, you might have noticed my use of wood grain. Some of the blocks were topped with strategically placed pieces of 1/4 inch plywood before carving. In this way, I was able to orient the wood grain in various directions, even on one block—a trick that owes a lot to Paul Klee's ideas about visual polyphony.

Detail


But all this work does not give the whole story of the process involved. Before making the print, I had to make test prints to find the formulas for the colors because most of the colors, as we can see, exist only after two or more inks combine.

The final print has scores of different colors in it. In order to know the formulas for each color in the final print, I had to make some test prints first. Using these test prints, I could tell which area to leave raised on which blocks in order to get the inks to combine into a particular color in a particular spot on the print.

Test Prints
If you look closely, you will see that the first ten color swatches from the left in the top row are the colors of the inks I used for each of the woodblocks. Those ten colors combine to make the rest of the colors you see in the test prints. I had made a cheat-sheet noting the formulas for each swatch.

At one point, I hauled all twenty test blocks fifteen miles by foot and buses across town to a printing press. I pulled my tests and got kicked out of the art center only minutes after finishing because of an auction I hadn't been told about. After two more bus rides and a lot of walking, I made it the fifteen miles back home in time for my canvas bags to finally start ripping apart from the weight.

Printmaking is hard work. After all this preparation, only two prints were made in the laborious process of inking and hand-rubbing the ten blocks that combine to make the final image. It was the last printmaking I did before turning to painting. I had never made a print like this before. Previously, my woodblock prints involved just a few blocks and I had pulled the prints on presses. But I'd seen hand-rubbed woodcuts made with many blocks and I knew I could do something similar.  I had only an idea what the print might look like, though, and until the last few runs, it didn't look like much at all. One of the joys of printmaking—like photography or ceramics—is seeing the art for the first time when the process is complete.

One of the two final prints was exhibited in a show at the University of Washington and they are both now in private collections. There are slight differences between the two, so they are considered an edition of two unique prints. Because of the weight and size of the blocks, as I mentioned, I had to destroy them; I can't carry such things around with me in life. That means someday these two prints may be considered rare examples of my early work.


Here, again, is the finished print:


P.S. I completely lost this whole post due to either a computer glitch or user error, depending on how you might want to look at what I did! But I was able to completely redo the post with minimal variation from the original in only about 20 minutes because I back up things. Always back up things manually! It's actually the auto-save that destroyed the original post, so you can't rely on the computer to do it for you. And, as always, my new post is an improvement over the crashed one!

Tuesday, August 13, 2013

Building an easel

—News from the studio—

It's very common for an artist to build something to solve a problem or meet a need in the studio. Many times, I stop everything and construct a solution. It may take an hour or it may take longer. I've found that it is always worth the work to customize my shop. Here's the story of one solution.

Coming back from the art supply store a few years ago, I met my brother-in-law on the road, going the opposite direction. I discovered he was heading to the woodworking store, so we went together. I had just looked at an easel and had decided I could build the same thing myself.

We came home with a couple sticks of quarter-sawn oak and went to work. In a day, we'd made an easel that is stronger and taller than the model I was looking at. In the end, I spent about the same amount of money as it would have cost to buy the easel. But I made it my own, and it works great.

The easel, newly built

Here's the process we followed to create the easel.

The wood

To begin with, quarter-sawn wood is cut straight from the tree without additional milling. The easel model in the art store would have used wood that was thinner. Also, my wood was cut with the grain running across the thickness to aid against warping. I don't know how the wood in the store model was milled.

The main rail

This easel has two legs. The back support is a simple plank of wood. The post in the front is cut with angled sides for the top and bottom sliders to run on.


The front post with angled sides

The base

The front rail has another piece of wood attached at a tee on the bottom with four stove-bolts. We screwed rubber feet on the bottom of the base, and another rubber foot on the bottom of the rear leg.

Base from the rear with lock nuts on the stove bolts
The base has two rubber feet


The hinge and chain

The two legs of the easel are connected with a simple gate hinge and a chain to keep it from unfolding. The front post extends up past the hinge.

Hinge at top

Chain

The top slider

The top slider is built of four pieces of wood. It's what holds the top of the canvas or panel in place. It rides on the front post with two beveled clips on the back that form a groove for the front post to ride in. The positioning knob tightens to create tension and hold the slider in place anywhere on the post.

The top slider with rear clips and positioning knob.

Here, we can see the channel in the back of the slider that matches the shape of the front post.

Top slider from above

The position knob

The position knob is the crucial part of the easel design I saw at the art store. Above, you can see we've used a knob we found at the home-remodeling store. We drilled from the back with bits that matched the diameters of the pronged tee nut that sits between the knob and the bushing.

Pronged tee nut

Initially we glued the tee nut as well as hammering it. But I discovered that the threads only lasted about three years, so the new ones are just tamped into place.

The slider bushing

We found a furniture glider to use as a bushing between the slider and the post. The small ones are the perfect fit. It is recessed into the back so that all the surfaces are flush.

The top slider from the back with clips and bushing

Bill came up with a great solution for tightening the knob against the bushing. He inserted a nickel coin into the glider for the post on the knob to hit.

Furniture gliders. One has a nickel inserted.
We inserted a metal washer in the front to protect the thread opening and give it a finished look.


The bottom slider

The bottom slider works in an identical fashion, except it is bigger and the canvas support is on the top of the slider instead of the bottom. Both the sliders have notches and grooves to accommodate hardboard panels or canvas boards.

The bottom slider
The bottom and top sliders use the same clip design

And that's all there is to it. The whole project came together quickly with just a table saw and drill.

And here's the easel after three years of painting.


Click any image to open a gallery of larger images, and hit escape to return to the blog.

Saturday, August 3, 2013

Teaching children to miss the point

—Art education—

Yesterday, I saw a museum lesson plan directing children to study a famous artist. It was filled with rubrics and schema and handouts and directions for implementation. But, for all the effort that went into constructing this recipe for learning, the lesson completely missed the point of the artist's work. Similarly, the day before, I saw a lesson plan that asked students to make art in the "style" of a famous artist, but the students only copied the subject matter and maybe the angle of view which is important but is not the most crucial component of the artist's style.

When I guide students to study an established artist, I help them determine what the artist was up to. There are two kinds of art. Many artists do both. One kind of art is timeless in terms of design principles. We might need some context to understand some of it, but don't require any specific knowledge to appreciate the aesthetics. If artists of a time period challenged each other with opposing concepts and approaches, then it helps to know this.  But that isn't required.

The other kind of art is mostly contextual. The point of the work has to do with something that was happening at the time. There are some design qualities we can talk about, but mostly what is timeless is the provocative nature of the art—the response it demanded at the time. Artists always do something like this. But, in this case, we need more information.

So, it is very important that students are encouraged to learn as much as possible about an artist. That means going deeper than the surface. If, for sake of example,  I decide to have my students explore Rauschenberg, I'm not going to have each student bring in a stuffed animal to shove into a tire (apologies if you've done this—I only just dreamed up the idea as an example and hopefully not too much of a straw man). I'm sure that some art lovers would look at such projects approvingly. But we'd all be missing the point and teaching the kids to miss it too if we only copied or explored the immediate content.

I once had a student show me something she made on her own and she said, "that's how Maya Lin would have done it." This is learning: when a student has a deep enough understanding of an artist's style that she can make the knowledge her own and later apply it to a completely new situation. My student understood qualities of Lin's style that transcended the immediate context and specific design of the art we had examined.

That's what I want them to do.